Why do you dream of a mammoth? Family dream book Dream book: seeing a mammoth in a dream - If you...


Do you have a lot of jewelry and would like to store it on your dressing table in a beautiful box? Or are you looking for something else to diversify your home interior? Then you should stop by our page, and we will tell you in detail how to make a jewelry box with your own hands. Let's consider the most affordable and popular options.
Content:
In order to create a feminine and elegant casket, you will need the following materials:
Master class. Step by step instructions
Step 1. Cut cubes of the same size from milk cartons without a bottom.
Step 2. Take one part of the shoe box and insert the resulting cubes, glue them together. These will be the cells of the box.

Step 3. Cover the resulting box with wrapping paper, and the bottom and interior walls kraft paper.

Step 4. Let’s make a spectacular “wrapper” for our box:


Instead of beads, you can use beads, glass beads and even rose petals, dried or artificial. Decorate the box according to your taste and style, showing imagination and desire.

Creating a beautiful box yourself is actually quite simple, you just need to pay attention to the objects around you at home and use your ingenuity.
Examples could be following products:
To create such a cute little thing, take an empty round package of cotton swabs. Cut pieces of colored fabric to the size of the bottom, walls and lid of the future box and carefully glue everything with colorless glue. You can decorate the box with beads, feathers, and various ribbons.
If you have a child in the house, ask him to paint the box himself. Such a cute casket will look great in your bedroom and nursery.
It’s good when a needleworker is on the same page with knitting needles and knitting threads. With their help you can knit an outfit for a box in a very original way.


If you love candy and accidentally left a plastic box of it, rejoice: a cute box for feminine items is almost on your table.
Take a transparent package, sand it with sandpaper, and then cover it with acrylic primer (you can make uneven layers and squiggles). The next step will be painting.
Let the box dry and start decorating.


Design option:
To do this, prepare:


To decorate such a box, it is advisable to opt for designer cardboard, which you can either purchase ready-made or create with your own hands.
Making a casket like the one in the photo is quite easy. You should take only a few matchboxes and glue them in pairs to form some small chests of drawers. To ensure the base does its job, choose thick cardboard and make squares.


Will make an elegant box colored paper with beads, beads and ribbons, stickers, button applique. You can tie it in an original way with multi-colored woolen threads.
The most unusual and aesthetically pleasing boxes are made from books that have served their purpose.
To do this, remove all the sheets, leaving only the frame (step back 2 cm from the edge). All pages should form thick walls; to do this, glue them along the entire perimeter. The base is ready. Any little things will be useful in decoration: beads, beads, parts of old hairpins or belts, artificial flowers, lace, scraps of beautiful fabric, etc.
With a little imagination, you can make a beautiful, comfortable, exclusive box yourself. Of course, it will be different from what is offered in stores, but it will be able to compete with them and take worthy place on your table.
One of the easiest options is to transform seemingly unnecessary items such as empty cotton swab containers, boxes of chocolates and matchboxes.
1. Box from packaging for cotton swabs
An empty round package of cotton swabs will come in handy. It can easily take on the role of a box, and you can decorate it with a small piece of colored fabric, beads and feathers.


2. A box made from a plastic box of chocolates.
Thanks to simple decoration, it can be turned into a beautiful jewelry box in half an hour.
Advice from the site: for better adhesion of the paint, the plastic surface must first be sanded with sandpaper, and then it can be covered with acrylic primer, on which the paint adheres well. When the paint has dried, you can begin plastering and artistic work. For greater realism, you can make reliefs, wavy notches on soft putty.
Here is one option for decorating such a box. We cut out drawings from a napkin with a marine theme and glue them with decoupage glue. We create our own composition. So the box turns into a real marine-style box. To prevent our art from getting torn off, we open it with acrylic varnish. Full instructions located at the link.


3. Shoebox Jewelry Box
If you stock up on PVA glue, super glue, two cardboard shoe boxes, red or other size velvet, a small piece of printed crepe satin, interlining, golden faux leather braid and foam rubber (as an option, replace it with regular dishwashing sponges), then you can make such a beautiful box.
Available materials include: iron, scissors, ruler, pencil and pen, newspapers for patterns, matches for firing fabric, stapler with 20 mm staples, cardboard, narrow tape.
A master class on creating a functional jewelry box is published on the website.
For starters, here are just a few photos.


4. Empty boxes matchboxes
As for matchboxes, they should be glued in pairs, creating chests of drawers. As a base, use squares of the same size made of thick cardboard. An upper tier can be added to the resulting structure. You can decorate with buttons, beads, applique.


5. How a jar of cream turned into a box
An excellent option for creating a box is to use a container of hand and body cream. The result is a compact jewelry box that closes tightly and has one compartment. You can decorate it simple drawing, sticker or any other curiosity.


6. Jewelry box made from a tin tea box
You can also always decorate a tea or biscuit tin, old box or other container. The ornament around the perimeter can be depicted as an eggshell, the design is a flight of fancy. Beads, rhinestones, beads - all this will be useful to you!


7. Boxes of unwanted books
There are many options for boxes made from old books. The principle of their creation is almost identical, but the design is unique. An unnecessary book is taken as a basis, in which the insides are cut out along the perimeter, departing 1.5-2 cm from the edge. Then all the pages are glued together and on the sides. And then it’s a matter of your imagination. You can decorate the box with lace, flowers made of paper or napkins, beads or beads, ribbons and velvet.

 8. Serpentine boxes
And finally, a real work of art in which you can also store jewelry. The author of small serpentine boxes is the Spanish artist Fabi.
To make boxes, colored serpentine is first untwisted and then twisted, alternating colored stripes. The finished discs are shaped by carefully squeezing out the middle. The shape is held using PVA glue or varnish. They are decorated with polymer clay.


Master class on the topic:
It is quite possible to make a box with your own hands. The main thing is to think through the frame. Whether to glue it together from cardboard or use ready-made unnecessary containers is up to you. A little effort - and an original accessory for storing jewelry and various necessary little things is ready.
A neat and unusual box on any woman’s dressing table is not only a very practical and useful thing, it is also an excellent interior decoration that emphasizes the individuality and style of its owner. Nowadays there is a very large selection of all kinds of chests of drawers, drawers, boxes and caskets. Wooden, ceramic, glass and of course the most beautiful - textile. By listening to the author’s recommendations, you can make such a box yourself. This box is simply imbued with warmth and comfort; it can be an excellent gift or an excellent decoration for your dressing table.
First, let's prepare all the necessary materials and tools:
1. Thick binding cardboard.
2. Thinner cardboard. The author uses designer cardboard with a thickness of 260-280 g/m3.
3. Several types of fabric.
4. A piece of fleece.
5. A piece of round.
6. Carved wooden or other interesting buttons for decoration.
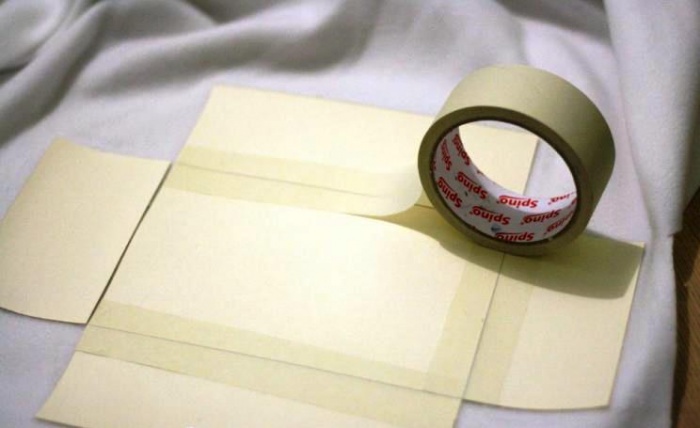
7. Paper-based tape.
8. Scissors.
9. Stationery knife.
10. Stationery clips for papers.
11. Ruler.
12. A simple pencil and eraser.
13. Universal transparent glue.
14. Sewing machine.
1 step.
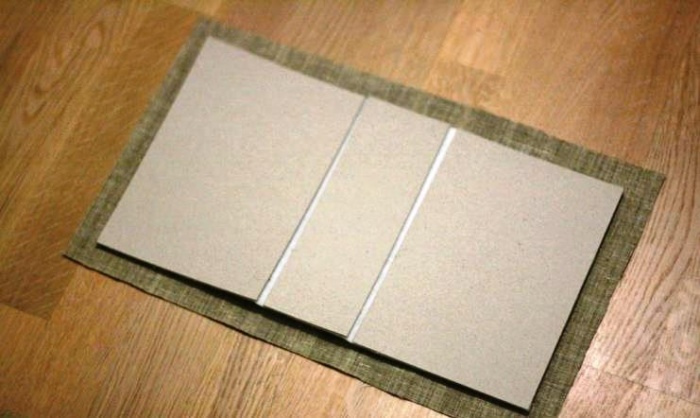
First, let's draw out all the necessary parts on cardboard and carefully cut them out. In the photo below, all the darker parts are parts made from binding cardboard, and the light parts are parts cut from designer cardboard. To make it more clear, later in the text we will designate thick binding cardboard as PPK, and thinner designer cardboard as TDK.
Now let's take a closer look at the details in the photo above:
The cross in the circle is a small mistake, an absolutely unnecessary detail.
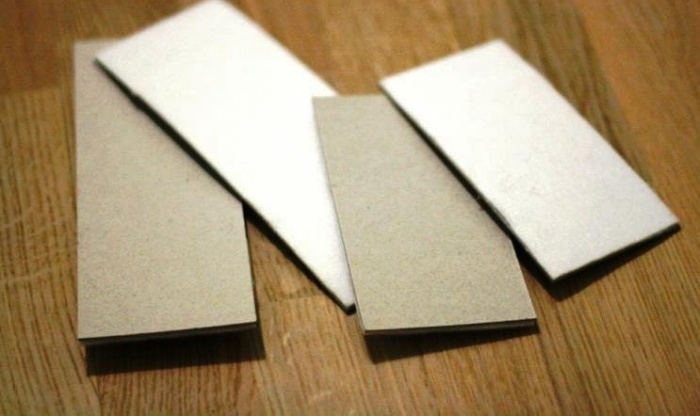
No. 1 - you need four pieces measuring 7 cm x 13 cm, two pieces from each type of cardboard.
No. 2 - you need four pieces measuring 7 cm x 19 cm, two pieces from each type of cardboard.
No. 3 - you need one piece 7 cm x 19 cm, cut from TDK.
No. 4 - you need one piece 7 cm x 20 cm, cut from PPK.
No. 5 - you need two parts 13 cm x 19 cm, made of TDK.
No. 6 - you need two parts 14 cm x 20 cm, made of PPK.
Step 2.
Now we select fabrics that harmonize in color and determine which fabric will be used for finishing the inner sides, which one for finishing the outer sides and which one is suitable for the lid.
Step 4
Then we place this blank on the fabric that was previously chosen for the lid of the box. We cut out a rectangular piece from the fabric, not forgetting to add 1 - 1.5 cm for allowances on each side.
Step 5
Now carefully wrap the fabric on the inside of the cardboard blank and glue it with glue. Pay special attention to the corners, they should be smooth and neat.
Step 6
Now we sew the decor and a carved button to the outside of the lid, which will later serve as a clasp for the box. For now, put the blank for the lid aside.
Step 7
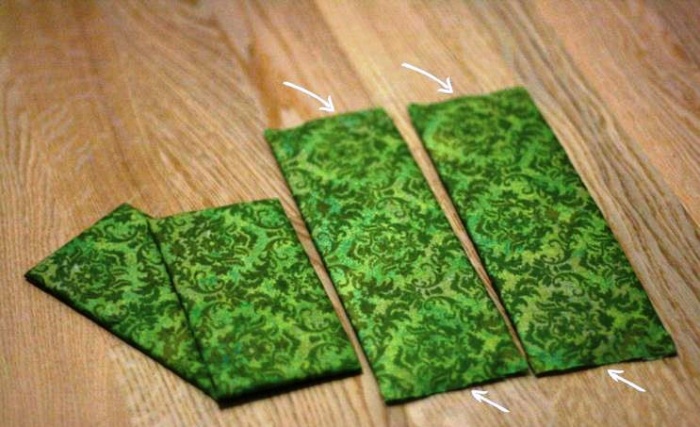
Let's take parts No. 1, No. 2 and one part No. 5, cut from TDK. We lay them out as shown in the photo below and glue them using universal glue.
Step 8
Now we tape all the seams between the parts with paper-based tape. This will make the entire structure more durable.
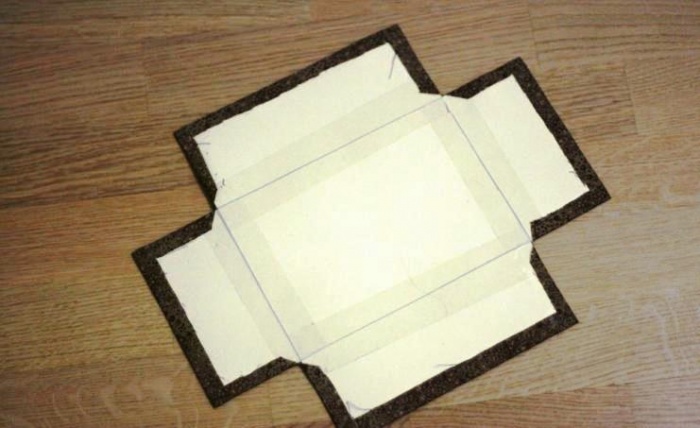
Step 9
Cut out the resulting blank.
Step 10
Now we take the fabric that we previously selected for finishing the inside of the box and cover the blank with this fabric in the same way as we previously covered the blank for the lid.
Step 11
With the help sewing machine We sew the workpiece along the fold lines.
Step 12
Now we fold the workpiece so that we get a box with the inner sides covered with fabric. We will strengthen the structure using the same masking tape. For now we put this workpiece aside.
Step 13
We take all the remaining parts from the PPK, glue them onto the fleece and cut them out.
Step 14
Then we cover them with the fabric chosen for finishing the outer sides of the box. A very important point: on long parts we leave the short sides open, that is, we do not bend or glue the material.
Step 15
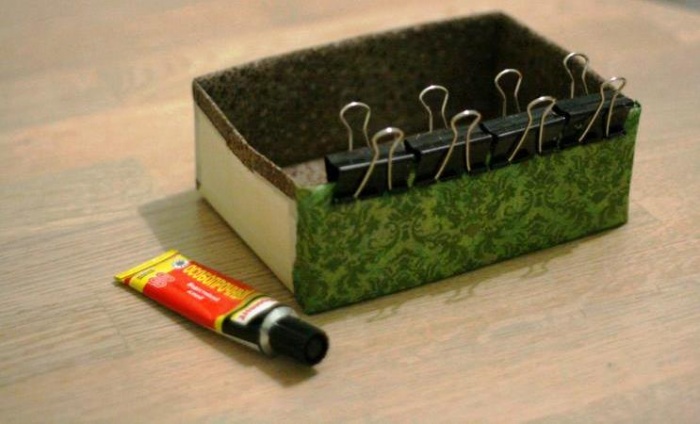
Now we glue the long parts to the previously assembled box and secure the structure with paper clips. We glue the un-glued material at the ends of the long parts directly to the body of the box.
Step 16
Now we glue two short strips covered with fabric onto the body of the box. Let's put the box aside.
Step 18
Now we glue it to the middle part located on the blank cover.
Step 19
We will cover the last remaining part from TDK with fabric to finish the outer sides.
Step 20
We glue this part to the cover blank so that it hides the place where the threads from the previously sewn button are visible. In this case, the author also placed his signature tag on this part. We'll secure everything with clamps.
21 steps.
And the last point: glue the box to the lid blank, after inserting a piece of rubber band folded into a loop between them. We will later use this loop as a lock and place it on the previously sewn button.
A very cute and adorable textile box is ready. Despite the fact that it is made of cardboard and fabric with glue, it is quite durable and comfortable. Thanks to the author for the recommendations and idea.
Unique boxes are created based on forgotten things, for example, glass jars, plastic bottles, cups or empty boxes. First, you need to put the container in order: wash it or clean it of dirt. If necessary, add the necessary details to the future box. These can be walls or bottom. Next, the clean container should be covered with cloth, and the necessary places should be painted. To give your jewelry box a softer look, use a thin layer of foam. To make the top of the box attract attention, cover it with fabric on which you can first embroider the desired pattern or a whole picture. If you want to give it a more elegant look, attach a braid to the box. Very often the joints are very noticeable, but you can hide them under ribbons or other beautiful decorative elements.
You can decorate boxes not with embroidery, but with painting. To do this, you should stock up on a ready-made box, paints, matte transparent varnish, tracing paper and a brush for stencil painting. Autumn is just around the corner, so an autumn box will come in handy. If you don't know how to draw, no problem! A drawing with an autumn theme can be found on the Internet, and then enlarged on a computer to the size of the box. After this, the autumn motif should be printed. Using tracing paper, transfer the outlines of the pattern onto photographic cardboard and cut them out. This is how we get a stencil. The surface of the jewelry box must first be coated with several layers of paint. After it dries, attach the stencil to the box using adhesive tape. It's time to paint your box, but you should do it carefully, with point-to-point movements. Care must be taken to ensure that the paint does not spread and damage appearance boxes. After finishing painting, the stencils should be removed. After complete drying, open the box with varnish.
If you want to fill the room with spring mood, make a box out of fabric. It should be noted that stores offer us a huge selection, but it is not always possible to buy a box the desired shape or size. This version of the box looks luxurious and rich; if you try very hard, others will have a hard time believing that the box is homemade. To get a truly amazing box, embroider patterns with beads for each side of the box. Additionally, it can be decorated with ribbons and beads. For decoration, you can opt for abstract patterns. Only your imagination should guide you when decorating boxes, then all your dreams will come true on the surface of this mini-chest.
Suitable for MK:
Czech glass beads, diameter 2 mm
The box is a wonderful thing in which you can store various little things. Not only is it functional, but it also brings a certain charm to the design of your room. However, you don’t have to go to the store and buy a suitable box. You can make it yourself from available materials. This DIY jewelry box will be a great addition to your home.
In this article we will look at what a box can be made from with your own hands, and how exactly.
A simple but beautiful box. To work you will need:

Now let’s look at a step-by-step way to bring everything to life:
Now the DIY postcard product is ready.

The most common option for self made- this is a tree. The material is affordable, beautiful and easy to process. This DIY box will be an excellent gift for a friend or family. You don't need special tools or expensive materials.

The base will be plywood, 4-6 mm thick. It is important that it is dry. To work you will need:
The first thing you need to do is draw drawings. One of these is provided below if you can't make your own.

Now you need to compactly place all the parts on the plywood, adhering to the dimensions. To make things easier, use templates. And finally, use a jigsaw to cut out all the parts. Having all the components on hand, it is easy to combine them into one beautiful box.

Your DIY plywood box is ready. This wooden gift, made by yourself, will please everyone.
Quite a simple and economical option. Here's what you'll need to get started:

As for the tools, the set is standard: a knife, scissors, a pencil and a ruler, a clamp, needles and threads. First, you need to cut the cardboard correctly. The photo shows how to do this. Light paper is thin, and darker paper is thick.

Pay attention! A cross indicates an unnecessary part.
So you see 6 types of paper. Let's figure it out;
This would be a great DIY craft box. Here step by step instructions according to its construction.
Take all pieces #4 and #6 and glue an identical piece of fleece onto them.

Place the blank on the fabric and cut out a rectangle, leaving a margin of 2-3 cm on each side.
Fold and carefully seal the edges as shown in the photo. You will have to do this often.


Secure the structure with paper tape.
All that remains is to cut everything around the edges.

Place the workpiece on the fabric and carry out all the same manipulations as with the first part.
For reliability, you can sew lines where there will be a bend.

All that remains is to bend it inward and secure it with tape.

The base is ready, you can put it aside and take the rest of the cardboard parts. Cover them with fleece.
As always, cover the whole thing with fabric. But please note that there is no need to bend the long strips on the short side.
Now glue the 4 pieces on the sides of the box. First long, and then short.
You can set aside the finished box. Take workpiece No. 3. Cover it with fabric. This time you need to cover the short sides and leave the long ones as is.
Why do you dream of a mammoth? Family dream book Dream book: seeing a mammoth in a dream - If you...

Every year there is an increasing increase in real estate prices. Own...

INTRODUCTION The problem of government intervention in the economy is the main...