That a terrible quarrel broke out among the Supreme Polemarch in the Achaean army...


Owners of Philips Xenium phones often need to connect devices to computer or laptop to download new information to your phone or internet connection. Connection process mobile phone is described in detail in the instructions, however, if you don’t have it, then use the recommendations below. These instructions apply to virtually any phone model, including Philips Xenium x518 and Philips Xenium v816.
1. It turns out that in order to connect a Philips Xenium phone to a laptop, either computer, first install it on your personal computer special software for connecting Philips Connect. It should come with your phone. If it is not there, download the program from the official Philips website.
3. Once your phone is connected, select the Pair menu option in the Philips Connect software. The computer will recognize the new device and mechanically install all the necessary drivers. Now you can work with the phone book, install applications and themes, synchronize your phone with your computer, and add to your collection of music and video files.
4. If Philips Connect does not recognize your unit, double check that the connection is correct. Make sure there is no problem with the cable or that Bluetooth is turned on on both devices.
5. If the phone still does not connect, send the settings directly to the phone through the Philips Connect program so that it is correctly identified and connected. This can be done with GPRS or 3G support.
6. If you want to connect your Philips Xenium phone to your laptop, either computer To access the Internet, do the following. In the same communication program on the PC, select “Share Internet Connection” to allow the PC to use the phone’s Internet connection.
7. If you are still having problems with your connection, download detailed instructions to your phone model from the Internet or directly contact the phone manufacturer to find out if your unit has any malfunctions. In addition, also try reinstalling the Philips Connect connection program on your PC - maybe the problem is hidden in it, and not in the phone itself.
If your mobile memory phone has the quality to end, then everything is for you more often with a question No. 1 is mobile connection phone to a computer or laptop. Lots of photos taken with your camera phone, a lot of audio files received via bluetooth greatly reduce the amount of free space in your phone. This problem can be solved by copying unnecessary files to a laptop. Read on to learn how this can be done.
You will need
1. When connecting a mobile phone To laptop you need to do the following: - turn on the mobile phone; - turn on the laptop; - connect the mobile phone to laptop via data cable. Turn on your phone and laptop. To pair these devices, use the data cable for your phone .
2. The data cable uses the USB data interface. USB (Universal Serial Bus) – universal serial bus. It serves to transmit or acquire some information. As usual, such a wire comes with the phone. Also in this kit there should be a disk with drivers, but not strictly (depending on the model phone).
3. When connected phone To laptop , operating system issues a request to install new equipment. During installation, not only the flash drive of your phone, but also a modem, the one that serves to connect to the Internet. If your kit does not include a driver disc, go to the developer's website. If any problems arise, we can also recommend contacting the forum of the manufacturer of your phone or technical support.
4. When disconnecting the phone-laptop connection, do not forget to use the harmless removal of the device. You can use this function by clicking the device icon in the tray, next to the system clock.
Video on the topic
All television screens are limited in the number of pixels. At the very simple TV the screen has a resolution of 1920x215;768 pixels, while more expensive ones have 1920x215;1080 pixels. Almost all modern models convert the low reception signal to their number of pixels. The same function can be performed by a computer through special programs.

1. Connect non-movable or portable computer, using such types of connectors as HDMI - the most well-known connector (their number will depend on the TV model), DVI - actually the same as HDMI, only it is used more often and combines connectors on computer e and a TV HDMI output. The VGA connector is used when computer has no digital analogues.
2. If your model TV does not support VGA, use an adapter for the YUV connector. It helps in reforming digital signals, but their quality is significantly lower compared to other connectors. Video connectors come in Scart, S-Video and Video, but their use greatly affects the quality of the signal received by the TV. This may cause the image to be blurry.
3. When connecting via HDMI, remember, in order for Windows to immediately appear on the TV screen, do not connect to computer have an additional monitor. Connect to power supply computer and not through an HDMI monitor. This will ensure that your video card works correctly for your screen resolution. TV. The image will appear on the screen and using computer and you will be able to adjust the desired resolution.
4. Sync via DVI. This connector is intentionally designed to transmit images to a monitor, but in current computer Yes, there are video cards that allow you to transmit sound and images to a TV screen.
5. If you do not have such a video card, use an adapter, but since in this case the audio signal goes through a cable, the image and sound may lag behind each other. Use the additional Reclock program to eliminate this inconvenience.
6. Use alternative methods of transmitting information to the TV: use a DSL router if the TV and PC are far from each other; transmit information via cable.
Mobile phones are often used to view web pages or work with various Internet applications. In addition, these devices can perform the functions of a modem needed to connect a desktop or mobile computer to the Internet.

You will need
1. Select the type of connection between your mobile phone and your computer. To connect your PC to the Internet, you can use either a USB cable or a Bluetooth wireless channel. If you are using a cable connection, install the appropriate software.
2. Most mobile phone models can use the PC Suite application. Select the version of the specified program. Look for the name of the mobile device manufacturer.
3. Install PC Site. Restart your computer. Configure Internet access settings on your mobile phone. In this situation, it is better to take care of connecting to an unlimited tariff plan in advance.
4. After checking the likelihood of accessing the network from a mobile device, launch the PC Suite application. Connect your phone to your computer's USB port. Wait until the mobile device is detected by the operating system.
5. Now in the phone menu, select “Modem” or PC Suite. Wait for the equipment synchronization to complete. In the PC Suite program window, go to the “Internet Connection” item by clicking the button of the same name.
6. Fill out the form that appears. Enter the same parameters that you entered when setting up your mobile device. Wait for a message to appear indicating that the connection to the server was successfully established. Launch your internet browser. Make sure that the computer has access to the network.
7. If you are using a Bluetooth adapter to connect your phone to your computer, install drivers for this device. Launch the installed software and enable phone detection via Bluetooth. Search for available devices and connect to your mobile phone.
8. Click the “Connect to the Internet” button, Wait while the program performs the necessary procedures. Check the likelihood of opening web pages.
Video on the topic
Video on the topic
Pay attention!
A program for synchronizing mobile phones with a computer, the main specificity of which is versatility. The program allows you to copy the list of contacts and the contents of the SIM card, etc. from your phone to a computer hard drive. Help for early phone models (Nokia 6210 with Bluetooth, 6310/6310i, 8910/8910i, Philips Fisio 820, Ericsson R520m, Ericsson T39m, Sony Ericsson T68/T68i/T610).
Useful advice
In order to synchronize a mobile phone with a computer, you need: 1. A wire such as a data cable, a USB cable, or the presence of bluetooth, wifi in the entire device. P.S. If there is no program for your phone model in the list, don’t worry. You can download a universal one, such as Sync Station, Mobile Media Browser, etc. You can download the synchronization program for LG, Nokia, Panasonic, Philips, Sagem, Samsung, Sharp, Siemens, SonyEricsson below.
Devices to computer or laptop to download new information to your phone or connect to the Internet. The process of connecting a mobile phone is described in detail in the instructions, however, if you do not have one, then use the recommendations below. These instructions apply to almost any phone model, including Philips Xenium x518 and Philips Xenium v816.
So, to connect your Philips Xenium phone to your laptop or computer, first install the special Philips Connect software on your personal computer. It should come with your phone. If it is not there, download the program from the official Philips website.
Once your phone is connected, select the Connect menu item in the Philips Connect software. The computer will recognize the new device and automatically install all the necessary drivers. Now you can work with the phone book, install applications and themes, synchronize your phone with your computer, and expand your collection of music and video files.
If Philips Connect does not recognize your device, double-check that the connection is correct. Make sure there is no problem with the cable or that Bluetooth is turned on on both devices.
If your phone still doesn't connect, send settings directly to your phone via Philips Connect to ensure it is detected and connected correctly. This can be done using GPRS or 3G.
If you want to connect your Philips Xenium phone to your laptop or computer To access the Internet, do the following. In the same communication program on the PC, select “Share Internet Connection” to allow the PC to use the phone’s Internet connection.
If you are still having connection problems, download detailed instructions for your phone model from the Internet or contact the phone manufacturer directly to find out if your device has any malfunctions. In addition, try also reinstalling the Philips Connect connection program on your PC - maybe the problem is hidden in it, and not in the phone itself.
Please note
A program for synchronizing mobile phones with a computer, the main feature of which is its versatility. The program will allow you to copy your contact list and SIM card contents, etc. from your phone to your computer’s hard drive. Support for earlier phone models (Nokia 6210 with Bluetooth, 6310/6310i, 8910/8910i, Philips Fisio 820, Ericsson R520m, Ericsson T39m, Sony Ericsson T68/T68i/T610).
Useful advice
In order to synchronize a mobile phone with a computer, you need: 1. A wire such as a data cable, a USB cable or the presence of bluetooth, wifi in each device. P.S. If there is no program for your phone model in the list, it doesn’t matter. You can download a universal one, such as Sync Station, Mobile Media Browser, etc. You can download the synchronization program for LG, Nokia, Panasonic, Philips, Sagem, Samsung, Sharp, Siemens, SonyEricsson below.
Everything interesting
Mobile phones are often used to view web pages or work with various Internet applications. In addition, these devices can perform the functions of a modem necessary for connecting to the Internet on a landline or mobile...
Modern mobile phones have a built-in module for connecting to the Internet via a wireless channel. Many of these devices can be used as an adapter to connect a desktop computer or laptop to the network. To you…
All modern mobile phones allow you to set your favorite mp3 music as a ringtone. You can assign a different ring tone to each subscriber, or assign a specific melody to the group. You will need a mobile...
The phone book is perhaps the most valuable information stored on a cell phone. Unfortunately, both the phone and the SIM card can become unusable over time, and the phone book may be lost. To be on the safe side...
To install applications on a mobile phone, a laptop or desktop computer is usually used. This allows you to save money spent on paying for Internet traffic when downloading applications from your mobile phone. You will need-…
If you decide to use a mobile phone to connect a computer or laptop to the Internet, then consider a few rules. Remember that you will need a special USB cable or BlueTooth adapter. You will need - PC Suite.Instructions...
Today, even the most sophisticated person can choose a mobile phone to suit his taste. Companies offer a huge selection of features and models. And the use of these functions is individual for everyone. It is important to set up your...
The majority of modern phones, smartphones and communicators have modem functions. This means that these devices can serve as a link between the computer and the Internet. You will need a USB cable. Instructions...
Synchronization is usually called the operation of copying and transferring data between a desktop computer and mobile device. This procedure does not require extensive knowledge of computer programming or software...
There are several ways to connect the Internet to a laptop. If you have a home telephone, then connecting your computer to the Internet via a telephone line can be done via a regular modem (the so-called dial-up connection or...
Did you know that Philips developed the Philips Xenium X623 under conditions of austerity? No? Do you think that the price of the device has nothing to do with savings on production? So marketers know their stuff!
So what do we have? On our desk is a Philips Xenium X623 with 3221 series firmware. The firmware is buggy. Instructions have been issued for service centers (official, authorized) according to which, before attempting to repair anything (even if the buttons are stuck), you must update the firmware.
For Philips Xenium X623 we offer several PDF files with manuals. You need to open the PDF using Adobe Reader.
To connect the device to a PC, you will need Philips ExpressConnect (). In most cases, the software offered on CD in the box with the phone refuses to work on Windows 7 or Vista. And if you have a 64-bit operating system, then you simply have no other alternative but ExpressConnect.
So, step by step:
The program can:
As you can see, the list of program features is simply huge.
To surf the Internet comfortably, you'll need a decent browser. We recommend using Opera Mini - .
To restore the device settings and clear all its memory, including installed applications and call and SMS logs, dial the combination: *199*001*3221* . After this, the device will reboot with factory settings. If this does not happen, install the ExpressConnect () program and select the "Reset" tab there. Please note that this operation does not clear the memory card, but only the memory of the device itself. If necessary, the memory card must be formatted.
In this article we will configure a media server (DLNA) on a computer for a Philips TV. After setup, you will be able to watch movies, photos, and listen to music on your TV that is on your computer (laptop). All this using DLNA technology. This means that the TV can be connected to a computer via Wi-Fi. More precisely, the computer and TV must be connected to the same Wi-Fi router. Via network cable or wireless network.
I'll explain in more detail. Do you have a Philips TV (in this article we will talk about these TVs), with support (if you have a Smart TV, then there is definitely DLNA support). Your TV is connected to the Wi-Fi router (via Wi-Fi or cable). Also, a computer is connected to this router. We launch the DLNA server on the computer, open the necessary folders with videos, photos, or music, and simply start watching on the TV. Everything is over the air, without wires. It’s very convenient; you don’t have to write movies to a flash drive all the time. We simply access the computer, select the desired movie and watch.
Using the method described below, you can run a DLNA server on Windows 7, Windows 8, and even Windows 10. To launch and manage the server, we will use the free, simply excellent program “Home Media Server (UPnP, DLNA, HTTP)”. I recently showed how, where we launched a server using a proprietary program. Since Philips does not have such a program, we will use the “Home Media Server”. The program is really very simple and cool.
We will need:
You can do without third-party programs and configure everything using standard Windows tools. I wrote about how to do this in the article.
In fact, a server launched in this way will be able to see absolutely any TV: Philips, Sony, LG, Samsung, etc. Sony, by the way, already has models on Android TV. So, the instructions for them should also be suitable. Unless access may differ before viewing the contents of the DLNA server on the TV itself.
First, download and install the program "Home Media Server (UPnP, DLNA, HTTP)". I recommend downloading it from the official website: https://www.homemediaserver.ru/index.htm. Click on the button Download opposite the EXE version. The file size is approximately 35 MB.
Save the file, then run it and follow the instructions to install the program.
Launch the program using a shortcut on your desktop or from the Start menu. First of all, we need to configure access to files on the computer. We can open only certain folders, all local drives, or even removable media for the TV.
In the program window, click on the button at the top Settings. We are interested in the first tab, Media Resources. There will already be three folders open there. These are standard. To open access to all local drives on your computer, check the box next to Local disks. To open access to removable drives, check the box next to Removable drives.

If you want to open, for example, only one local drive or folder, then do not check these boxes, but click on the button Add. And in Explorer, select the drive or folder that you want to open for viewing on your TV. The folder will appear in the list. You can delete a folder by simply highlighting it and pressing the button Delete.

I think the meaning is clear. You can open only one folder, which contains, for example, your movies. And you can open all disks. I recommend checking the box next to Local disks. Then, the My Computer folder will be displayed on the TV, in which you can view all files.
At this point, the setup can be completed by pressing the button Ok. If you want, you can also go to the tab on the side Server, and change the name of your DLNA server. It will be displayed on the TV.

Click the button Ok to exit the settings.
To start the DLNA server, click the button Launch.

If your TV is turned on and connected to the router, then in the program window, opening the tab Playback devices (DMR), you will see your TV. This means everything is fine. If the TV does not appear, then check the connection, and see the tips at the end of this article.

The program can be minimized. You can proceed to setting up DLNA on your TV.
Press the button on the remote control SOURCES.

On the menu Sources choose Network (media). Or run the program Media from the Android TV menu.

Select the server running on your computer from the list.
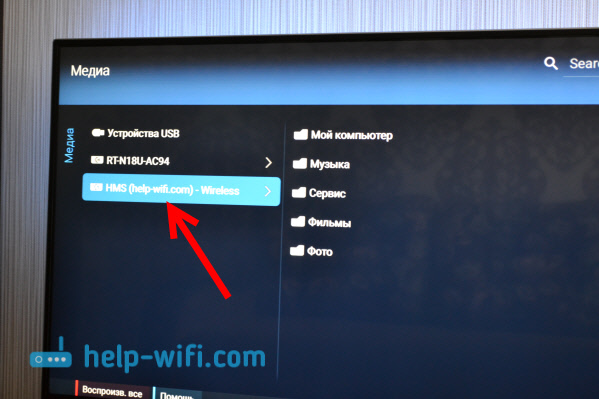
If you have opened all local drives, then you will have a My Computer folder. Select it, all the disks will be there. You can open the desired folders and start watching movies, photos, or playing music from them. If you open one of the standard folders: Movies, Photos, or Music, then all available content will be there, sorted into different categories. To view content by folder, select Media Resource Catalogs.
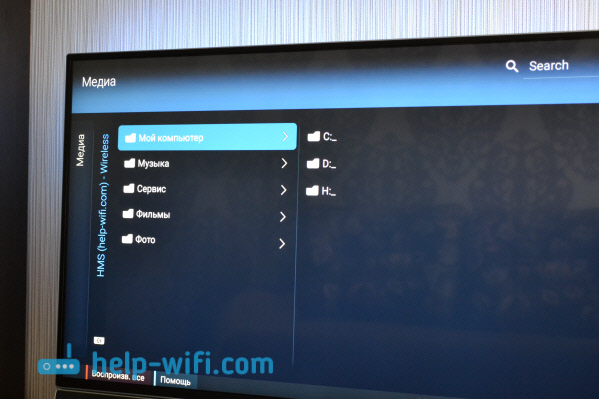
Select the folder with your movies and simply start watching the desired file.

That's all the setup. From the TV we got full access to the videos, photos and music that are on your computer. The program "Home Media Server (UPnP, DLNA, HTTP)" will prevent your computer from falling asleep and interrupting movie playback. You can also control viewing from the program itself on your computer. There are a lot of settings and possibilities there, I think you’ll figure it out.
The most common problem when setting up such a scheme is the lack of a running server on the TV. When files are from a computer, they simply do not appear.
In such situations, the first thing you should always do is check the connection of the TV and laptop to Wi-Fi, or the connection via cable. Perhaps one of the devices simply turned off. Turn off and on the TV. You can also restart your computer and start the server again. You can also try disabling the antivirus, which may be blocking the TV connection.
In such cases, you most likely started watching a very difficult movie. And the router cannot cope with transmitting information. Typically, this problem appears on cheap routers and when connected via Wi-Fi. Large films, in high quality, that do not want to be played via DLNA, are better watched from a USB drive or hard drive.
There are times when the TV does not want to play a video file. Most likely, the standard player simply does not support the format, there is no codec. In this case, if you have an Android TV, you can install VLC player from the Google Play Store. It can also play files from local network. And most likely, it will play videos that were not opened by the standard player.
Owners of Philips Xenium phones quite often need to connect the device to a computer or laptop to download new information to the phone or connect to the Internet. The process of connecting a mobile phone is described in detail in the instructions, however, if you do not have one, then use the recommendations below. These instructions apply to almost any phone model, including Philips Xenium x518 and Philips Xenium v816.
That a terrible quarrel broke out among the Supreme Polemarch in the Achaean army...

Why do you dream of a mammoth? Family dream book Dream book: seeing a mammoth in a dream - If you...

Every year there is an increasing increase in real estate prices. Own...